Main Characters
Leo- The Shop centers around Leo, a pretty average gamer, who is a new hire trying to fit in and join into the already established groups at the shop. He only knows Lincoln, which is his cousin, so at least he knows someone. He is eager to fit in with his coworkers, but at the same time he is kinda timid about opening up to strangers. Leo doesn't have very many friends, but he makes up the lacking friendship with his pet fishes that he so frequently mentions. He often finds himself in awkward situations with his sense of dry humor which at times can lead to some ridiculous shenanigans, and sometimes even helping him escape trouble. He is very sarcastic which plays well with his sense of humor, but at times many of his coworkers can't tell the difference between a sarcastic remark or a real compliment. Leo is oldest of the main characters at 27. We will mainly follow Leo and his journey to try to meld his way into the shop crew.
Doyle - The recently promoted assistant manager of The Shop. Doyle quickly becomes friends with Leo as their dry sense of humor and sarcasm mirror one another. As so often with newly promoted managers straight out of corporate training, Doyle is eager to show off the corporate way of doing things. He has a uncanny ability of complementing someone while at the same time shunning them; this particularly gets to Kerrelyn as they both often butt heads. At times his and Leo's pranks push the boundaries of the rest of the shop members, and sometimes even crossing the line. Doyle is the second oldest of the main characters at 23.
Kerrelyn- The flirt of the shop. Kerrelyn likes to boast about her social life. She flaunts her "rockstar" lifestyle of drugs, sex, and rock and roll. She is constantly a "one upper" and always has a better and more entertaining story. Kerrelyn is a compulsive foul mouth and often has to restrain herself from cursing. She often hangs out at the shop even when she's not working, when asked about why she isn't hanging out with her much older "rockstar" friends she simply replies with some outrageous story of why they are out of town. The rest of main characters often suspect that Kerrylyn is living a fantasy life to fit in or seem cooler. Nobody at the Shop has ever met any of her friends. Although her fierce and sometimes raunchy flirting may lead to believe she is a sex machine, she is often self-conscious and awkward around men she finds attractive.
Clara- The Dramatic. She comes off as ditsy, scatter brained, and eccentric with occasional bursts of insight. Clara tends to make herself laugh uncontrollably. The laughter of others often fuels her own laugh and at times she passes out from oxygen deprivation. Shes a crier, often her coworkers are baffled by her tears. She is the youngest of the group at 18, but she is the most sociable as well. She is best friends with Kerrelyn. She often surprises the main characters with the weird things she says, this later leads the main group finds out she lives a secret life of a dominatrix, coming from such a character its very surprising.
Supporting Cast.
Wayne- The boss. Wayne is your typical "try-to-be-cool" boss. He is much older than his employees and often tries to fit in with them. He takes a liking to Leo because of their age. He is often seen trying too hard to fit in and sometimes butting into conversations with "cool" talk to make himself seem younger and relevant. While no one at the shop dislikes, no one really takes him serious.
Billy John- The redneck. Hunting, camo, guns, fishing, beer, country music, 'MURICA! Basically sums up Billy. He he the oldest at the shop, and has been at the shop for 10 years and before that 7 years at the competitors shop, all in all 17 years in the craft. He is the most respected at the shop, and literally knows everything there is to know about it.
Kevin- The hipster hippy. Kevin who likes to be called Kev is all about being non-conformist, he's vegan, wears only all nature shoes and pants. Kev is a liberal arts major with a minor photography and creative writing. He tends to speak like Yoda but without the fucked up backwards phrasing. He is always seen making his all natural foods and drinks at the shop which no one ever dares and tries.
Jake- Young spoiled know-it-all. Jake is the youngest at the shop and the most naive as well. He tends to think he knows it all and at times interrupts people to correct them. He lives with his rich mom and dad and often complains how hard his life is for him He's in the first serious relationship of his life and like everything else, he thinks he knows the secret to relationships. He tends to get on his co workers nerves with the fact checking on everyone.
Lincoln- The Mysterious. Lincoln is one of the assistant mangers at the shop. Not much is known about him, he often tends to keep to himself and refrains from talking about things outside of work. one thing is known about him though, he's Leos cousin.
Thursday, June 4, 2015
Sunday, February 22, 2015
Complete Run Through on Aquarium
Everyone knows that I'm into aquariums and my last blog was an update on my 60g cube, so I figured I'd do a complete in and outs of what I've got going on. We'll start on hardware and then move onto the live goods.

Glass Top: The tank did not come with a glass top so I had to purchase it separately, The glass top helps with evaporation but also hinders the lighting a small amount.
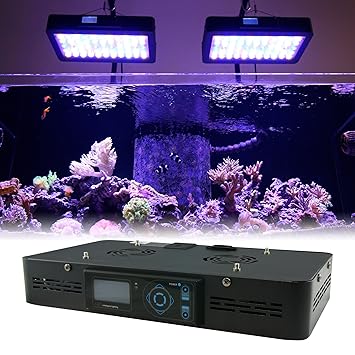
Lights: Euphotica Lite 16" dimmable full color spectrum programmable lights. They put out 120watts of light power. After a lot of research I found out these are best alternative Euphotica Lite

 lights for the Radions which can run more than twice the amount of these lights. I have mine programmed to mimic sunrise and sunset, with a couple hours of moonlight at night, they are fully automated and come with a remote which is really nice. I highly recommend these lights if you can't afford or justify purchasing the Radions.
Tank: 60 Gallon Marineland Rimless cube with corner overflow also purchased the matching stand. Marineland 60g Cube
Glass Top: The tank did not come with a glass top so I had to purchase it separately, The glass top helps with evaporation but also hinders the lighting a small amount.
Lights: Euphotica Lite 16" dimmable full color spectrum programmable lights. They put out 120watts of light power. After a lot of research I found out these are best alternative Euphotica Lite
 lights for the Radions which can run more than twice the amount of these lights. I have mine programmed to mimic sunrise and sunset, with a couple hours of moonlight at night, they are fully automated and come with a remote which is really nice. I highly recommend these lights if you can't afford or justify purchasing the Radions.
Power Heads: Jebao WP10 and WP25. Currently I have 2 WP10's and 1 WP25. Like the lights I went for a cheaper alternative to the Ecotech line of powerheads. These powerheads work great, they each have a controller so you can control the flow and the wave making option. I currently have mine set up for random reef mode. They are pretty quiet not as quiet as the ecotech but at a 10th of the price its hard to beat. Jebao WP10/WP25
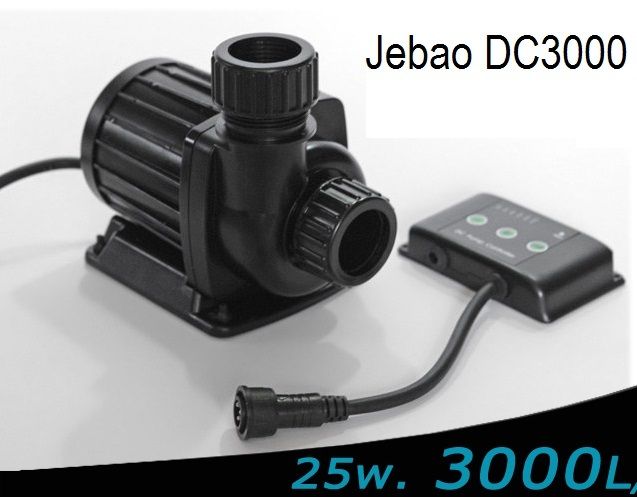
Return Pump: Jebao DC-3000. This return pump is awesome, and for the price it can't be beat. It even comes with a controller to adjust the flow rate which you only find on the high end pumps that easily run more than 3 times the price. Jebao DC-3000

Sump Tank: Currently I'm running a 20 gallon sump that I made, its a 3 compartment system with a small refugeium. In in it I have 10 pounds of live rock, a skimmer which I'll talk about next and the return pump that I mentioned above, its works great, in total it cost me about $15 dollars for the used tank and $20 for the additional glass and silicon to make the compartments.
Filter Media/Protein Skimmers: Reef Dynamics INS80. This was a game changer for my tank, I recommend this skimmer for anyone. The first couple days it was pulling out almost 2 cups of gunk out of my tank. It makes my water crystal clear, and everything in my tanks just looks healthier. Its the loudest thing in my tank, but compared to other protein skimmers its relatively quiet. The only draw back to using this was whenever I fed my tank would over flow, so I had to shut off my skimmer during feeding, which was annoying so I ended up buy a reef controller which I'll talk about next. The only filter media I run in my tank is Chemi-Pure Elite. Chemi-Pure Elite Reef Dynamics INS80

Reef Controller: ReefKeeper Lite System. This is one of my newest additions to my tank, its one of those items that aren't a necessity, but more of a luxury. It controllers everything in my tank from my heater, pumps, powerheads and skimmer. I currently have mine set up for a 27 minute feed mode. During this feed mode it shuts off power heads, pump and skimmer, and then turn them back on after the timer is done. It also controllers my heater, and monitors my water temperature. The last feature I have set is for a night mode in which it turn off my WP25 wave maker during the night for a calmer night mode in the tank. ReefKeeper Lite

Automatic Top Off System: JBJ ATO. I don't currently have this yet but it will be nice once I do. It should help out with stable parameters by replenishing water lost due to evaporation. JBJ ATO


Foods: I use a slurry of LRS Reef Frenzy, PE Mysis Shrimp, Brine shrimp and Reef Nutrition R.O.E Real Oceanic Eggs. I usually prepare it once a week in a bottle and store it in the fridge for easy access and prep time. Reef Frenzy PE Mysis Reef Nutrition R.O.E


Below are picture and a video of all the live goods that are in the tank.


 |
| You can see the 3 power heads on the left side of the tank. |
Return Pump: Jebao DC-3000. This return pump is awesome, and for the price it can't be beat. It even comes with a controller to adjust the flow rate which you only find on the high end pumps that easily run more than 3 times the price. Jebao DC-3000
Sump Tank: Currently I'm running a 20 gallon sump that I made, its a 3 compartment system with a small refugeium. In in it I have 10 pounds of live rock, a skimmer which I'll talk about next and the return pump that I mentioned above, its works great, in total it cost me about $15 dollars for the used tank and $20 for the additional glass and silicon to make the compartments.
 |
| Under the tank in the cabinets where the Sump and Skimmer are located. |
Filter Media/Protein Skimmers: Reef Dynamics INS80. This was a game changer for my tank, I recommend this skimmer for anyone. The first couple days it was pulling out almost 2 cups of gunk out of my tank. It makes my water crystal clear, and everything in my tanks just looks healthier. Its the loudest thing in my tank, but compared to other protein skimmers its relatively quiet. The only draw back to using this was whenever I fed my tank would over flow, so I had to shut off my skimmer during feeding, which was annoying so I ended up buy a reef controller which I'll talk about next. The only filter media I run in my tank is Chemi-Pure Elite. Chemi-Pure Elite Reef Dynamics INS80

Reef Controller: ReefKeeper Lite System. This is one of my newest additions to my tank, its one of those items that aren't a necessity, but more of a luxury. It controllers everything in my tank from my heater, pumps, powerheads and skimmer. I currently have mine set up for a 27 minute feed mode. During this feed mode it shuts off power heads, pump and skimmer, and then turn them back on after the timer is done. It also controllers my heater, and monitors my water temperature. The last feature I have set is for a night mode in which it turn off my WP25 wave maker during the night for a calmer night mode in the tank. ReefKeeper Lite
Automatic Top Off System: JBJ ATO. I don't currently have this yet but it will be nice once I do. It should help out with stable parameters by replenishing water lost due to evaporation. JBJ ATO

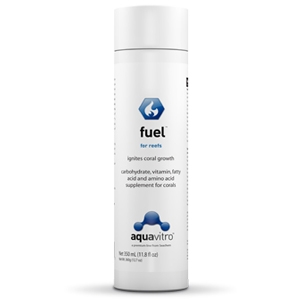
Random Other Things: Flipper Algae cleaner, I personally like the flipper more than the other brands, this one comes with a blade and you can flip it around while its in tank for just a normal scrubber, and at a fraction of the competitors price, its hard to beat. Flipper The only additives I use in the tank is Fuel by Aquavitro. Fuel

Foods: I use a slurry of LRS Reef Frenzy, PE Mysis Shrimp, Brine shrimp and Reef Nutrition R.O.E Real Oceanic Eggs. I usually prepare it once a week in a bottle and store it in the fridge for easy access and prep time. Reef Frenzy PE Mysis Reef Nutrition R.O.E


Monday, August 25, 2014
Update on new 60 Gallon cube
Recently I upgraded (some say downgraded from my 75 gallon) to a 60 gallon glass cube. The 75 was too big for the space I had it in, and the cube fits perfectly in the corner only sacrificing 15 gallons of water. I'll have to say that the cube looks amazing, the glass is crystal clear, the stand is nice and high to give you awesome views without having to kneel down. I'm starting to stock some coral in there, as i'm pretty satisfied with the fish, I might supplement the tank with a few more fish, but for now its good.
.jpeg)
.jpeg)
Goods in the tank:
- 30 pounds of fine live sand
- approx. 50 pounds of live rock
- 8 chromis
- 1 yellow tang
- 3 pajama cardinals
- 3 bangaii cardinals
- 1 true Precula clown fish
- 1 black ocellaris clown fish
- blue spot watchman goby
- 1 pistol shrimp
- approx. 25 hermit crabs
- 1 sleeper blue dot goby
- 1 peppermint shrimp
- 1 emerald crab
- 2 damselfish
- assortment of corals and inverts.
.jpeg)
Sunday, July 6, 2014
Electric Guitar build Part 1
Recently I started getting into woodworking and been doing a couple of projects. Mainly I've been doing small things from end grain cutting boards, yard dice, and even bigger projects like toy/blanket chests. One thing I've always wanted to make was my own electric guitar, or any type of guitar in fact. I really wanted to make an acoustic guitar but that process is way more complicated and in depth than its electric counterpart, maybe a ukulele will be in the works later down the road.
I decided to document the process of me trying to build my first custom guitar. After hours and hours of online research, from message boards to youtube to advice from friends that have gone through the process I've finally started the endeavor of building an electric guitar.
First I started the process by choosing the wood that I would be using, after a trip to my local exotic hardwoods store I decided on a two tone guitar style with basswood and black walnut.
Here you can see the rough piece of basswood and behind it the black walnut
Had rip the pieces to size I'm gonna make the guitar an inch and half thick, so I had to rough cut to a little bit bigger than that to leave some room for sanding and planing. Ran it through my table saw but the piece was too big to rip it completely through so I ran it once then had to flip it over to finish the cut on the table saw.
Here you can see I've already cut the pieces to the right length and depth. I put them together to see how I wanted to glue them up, I first I wanted to put 2 smaller dark walnut stripes instead of one big one down the middle but one I mocked it up I liked the one big strip down the middle more.
Now it was time for some gluing, applied a generous amount of glue on the joining sides. Type of glue I'm using on this build is Titebond Type 2.
Time to clamp it together, using 7 clamps here
After about 14 hours of clamping, usually I'd leave it overnight but its been so hot the glue sets up really fast. at this point its time to start planing, you can use and electric planer or an electric hand planer, I don't have a table top planer, but I do have the other two, I decided to use the hand planer to plane both sides. Hand planing was new to me so I had to take my time to fine tune the planer but after that was done it was easy.
After planing both sides with the hand planer, it was type for some sanding, I started with 80 grit on the hand held belt sander, it made quick work of smoothing everything down.
The next type of sanding I decided to do some hand sanding with some 150, then to 220 grit sand paper. This wont be the final sanding, I still have tons of sanding left.
To make things easier I'm gonna be using my Les Paul as a template for my new guitar. Its gonna be a modified version of Les Paul/SG/ES line of guitars. First I traced the whole body onto the blank.
Next I flipped the guitar over because I wanted the cut out or horns on both sides.
I wanted the guitar to have a "Fatter" look to it so I made the body a little bit shorter long wise.
Here is what the guitar looks like after the modifications to the original Les Paul.
Hard to see in the picture but you can see where I measured and drew where I'm gonna route out for the neck socket, I'll be using a bolt on neck for the guitar.
Here is the neck I'm gonna be using, I'm recycling a lot of the parts off my old Les Paul. Most people opt for using a pre-made neck, mainly because the spacing for the frets can be messed up so easily and only the slightest mistake can lead to a permanent un-tuned guitar. I'm gonna sand the neck down to bare wood, right now it a glossy black.
And lastly you can see here at what its sorta gonna look like once its done.
And that was my first day on making the my guitar! stay tuned for more updates on the progress!
Wednesday, March 5, 2014
Nano Reef P1
Recently as you might of seen on my Instagram or Facebook, I've dove headfirst into saltwater aquariums. So instead of blowing everyone's feeds with fish pics I'll be doing updates via my blog for anyone interested in the evolution of my tanks!
Well ever since I've started this hobby I get one question get asked over and over, "How much have you spent?" In this post I'm gonna break down exactly how much it would cost to get a set up like my 10g nano reef. So lets get started!


Well ever since I've started this hobby I get one question get asked over and over, "How much have you spent?" In this post I'm gonna break down exactly how much it would cost to get a set up like my 10g nano reef. So lets get started!
First lets start off with the hardware.
Lights: $100. Yes this might seem expensive for lights but in reality its pretty cheap, I custom made the hood and lights. I similar light fixture premade would run in $300-$500 dollar range. The reason they are so expensive is that fact that reefs require a certain light spectrum and power to sustain a healthy reef.
Tank: $20. Probably one of the more cheaper things in the aquarium. I opted for a rimless tank which makes things a bit more sleek and streamline.
Powerhead: $16. A small underwater fan that creates flow and current in the tank, you don't want stagnant water. I opted for a very cheap one, there are models that run upwards in the $400 range.
Heater: $20. Simple coil heater to maintain proper water temperature.
Sand substrate: $27. I choose a black sand to match the black trim around my tank. Its Hawaiian Black Live sand.
Live Rocks: $20. I got lucky on this one and had my local fish guy hook me up with some rocks. Usually you need 1lb for every gallon so I needed 10 pounds and rock usually runs anywhere from $3-$7 dollars a pound.
Total for Hardware: $203
Running Total: $203
Additives & Supplements
Coral Glue: $10. An underwater glue to glue coral to the rocks.
Coralvite: $10. Coral supplements
Fuel: $12. Fuel for the corals, promotes bright colors and healthy corals.
Reef Accelerator: $12. Promotes healthy purple coraline purple algae
Reef starter kit: $15. provides essential minerals and iodine.
Long tweezers: $8. to pick up and place coral.
Hydrometer: $15 to measure the salinity of the water.
Salt: $45. Great deal at my local fish store makes 200g.
Water Test Kit $50. Test the levels of the water, very important for an aquarium.
Total For additives: 177
Running Total:$380
Now we Get to the fish!
True Percula Clown fish: $25. Its the orange Clown fish in the picture above.
Black Ocellaris Clown fish: $30. Different species of Clown, but black. Pictured above.
FireFish: $10x2=$20. I have two of these fish, and probably one of my favorite types. Pictured above.
Gobies!
Yellow Clown Goby: $8, pictured above
Another Goby!
Blue Spotted watchman Goby: $16. These fish have a cool symbiotic relationship with pistol shrimp, they watch out and protects the shrimp while it digs up food for both of them, hence Watchman Goby.
Total for fish: $99
Running Total: $479
Inverts!
Peppermint shrimp: $5x2=$10. These shrimp can eat aiptasia which is a "weed" and can really mess up your tank.
Starfish!
Red Starfish: $25. One of the cooler things I have in my tank.
Hermits!
Red Tip Hermit crabs: $1x8=$8. These hermits keep the tank clean as they eat algae and waste.
Snails!
Mexican Turbo Snail: $2. This guy is a bulldozer, he keeps the glass and rocks clean.
Total for inverts: $45
Running Total: $524
Corals!!
Trees!
Kenya Trees: $20. 3 trees and another coral which I don't know the name, you can see it pictures in the first picture at the base of the tree, they came bundled together.
Mushrooms!
Spotted Mushroom: $30. Bought the whole rock you see with the mushroom as a bundle.
Torch
Torch Coral: $15. One of my favorite corals, they green tips glow under the blue moonlight setting on my lights.
Trumpets!
Trumpet Corals: $10. These corals are cool, when they multiply they head pinches itself into two.
Anemone
Mystery Anemone: $8. Not sure what kind of anemone this is but it looks sweet!
Polyps!
Zoanthus colony: $60. Goal is for they to fill in the spaces and become one huge colony.
Mystery coral: $25. These aren't pictures and I have no idea what they are called, You'll probably see them in a later blog.
Total for corals: $168
Grand Total: $692!
Whoa! was not expecting that much. This is what it would cost if you didn't have anything and started from scratch and wanted to have one exactly like mine. I had a lot of the supplies already from my fresh water tanks and big 75g tank so the actual cost was a lot cheaper. I don't wanna scare anyone off with the price, you can make a saltwater tank for much cheaper, also for a lot more. The cheaper route would be to start off with only fish, the cost would be around the $200-250 range to get it started with fish; you could then move on to reefs after that as well.
-Luz
Subscribe to:
Posts (Atom)